


2D Video Game in AssemblyScript Tutorial
How to build a web-based video game from scratch with HTML canvas and AssemblyScript.
Why AssemblyScript?
When targeting the web, WebAssembly (Wasm for short) provides a performant and secure alternative to JavaScript for game development.
AssemblyScript is a new TypeScript-like programming language made for WebAssembly. It is a nice option for developers that are not familiar (and don’t want to be) with system languages like C/C++ or Rust.
Programming in AssemblyScript feels like writing TypeScript code with some WebAssembly specifics.
AssemblyScript is a new kid on the block and although it is production-ready it still lacks some features of more mature languages such as regular expression or closures. Those will come soon and it is worth keeping an eye on the project.
Why web-based?
Here’s the thing: WebAssembly is a portable binary format that can easily be used outside of a web browser. However, this would require a Wasm runtime environment to be installed, which is not as simple as just opening a browser.
Our Wasm program will generate RGBA (red-green-blue-alpha) image data that will be rendered on an HTML canvas — a technology familiar to all web developers.
It is, however, fairly easy to implement the platform outside the web. You can check out an alternative branch where the game is being rendered to a terminal with Node.js.
Create a new project
In a new directory initialize an NPM project:
$ npm init
Install AssemblyScript dependencies:
$ npm install --save @assemblyscript/loader
$ npm install --save-dev assemblyscript
The AssemblyScript compiler provides a handy scaffolding utility to quickly set up a new project:
$ npx asinit .
Our AssemblyScript code will be located in the assembly directory.
To compile the AssemblyScript code to WebAssembly run the following command:
$ npm run asbuild:optimized
The binary Wasm and text Wat files are then located in the build directory:
$ ls -1 ./build
optimized.wasm
optimized.wasm.map
optimized.wat
HTML canvas
In addition, we need an index.html file with the HTML canvas and some JavaScript glue code to load and execute our Wasm module:
<!DOCTYPE html>
<html>
<head>
</head>
<body>
  <canvas id="canvas"></canvas>
  <script>
    // JS glue code comes here
  </script>
</body>
</html>
Since we want to achieve a pixelart effect for our video game we set pixelated image rendering together with the desired display size via CSS:
<style>
  canvas {
    width: 512px;
    height: 512px;
    image-rendering: -moz-crisp-edges;
    image-rendering: -webkit-crisp-edges;
    image-rendering: pixelated;
    image-rendering: crisp-edges;
  }
</style>
JavaScript glue code
We need a bit of glue code to load the Wasm module and render its output to the canvas.
First, we get a reference to the canvas and initialize it to the expected size:
const WIDTH = 100, HEIGHT = 100;

const canvas = document.querySelector('canvas');
const ctx = canvas.getContext('2d');
canvas.width = WIDTH;
canvas.height = HEIGHT;
Notice that the canvas size differs from the display size that we defined before via CSS. The display size is optional but the canvas size must match the size of the output image generated by the Wasm module.
The following code loads the Wasm module located in the default build directory and provides an error callback to the runtime environment when the Wasm module exceptionally aborts its execution:
async function loadWasm() {
  const wasm = await WebAssembly
    .instantiateStreaming(fetch('./build/optimized.wasm'), {
      env: {
        abort: (_msg, _file, line, column) =>
            console.error(`Abort at ${line}:${column}`)
      }});
    return wasm.instance.exports;
}
Next, we will call a start function of the Wasm module and set regular calling of an update function in an interval:
async function start() {
  const wasm = await loadWasm();
  wasm.start();

  const mem = new Uint32Array(wasm.memory.buffer);

  const imageData = ctx.createImageData(WIDTH, HEIGHT);
  const argb = new Uint32Array(imageData.data.buffer);

  const updateCall = () => update(wasm, mem, imageData, argb);
  setInterval(updateCall, 100);
}
The update function calls update on the Wasm module and copies the bytes from the Wasm linear memory to the HTML canvas:
let control = 1; // 1=right, 2=left

function update(wasm, mem, imageData, argb) {
    wasm.update(control);

    argb.set(mem.subarray(0, WIDTH * HEIGHT));
    ctx.putImageData(imageData, 0, 0);
}
The Wasm linear memory is a shared medium to exchange non-scalar data between the host and the Wasm module. In our example, the Wasm module writes the output image data to the memory and the host subsequently reads it.
Read my note on animation in canvas for further details.
To interact with the game we add a key-down event listener for moving right or left:
const Controls = {
  None: 0,
  Right: 1,
  Left: 2
}

document.addEventListener('keydown', event => {
  switch (event.key) {
    case 'ArrowLeft':
      control = Controls.Left;
      break;
    case 'ArrowRight':
      control = Controls.Right;
      break;
    default:
      control = Controls.None;
      break;
  }
});
As we can only pass scalar parameters to the Wasm module the meaning of the control values must be negotiated between JS and Wasm. In our case, 1 means right, 2 means left. Later, we will see a better option.
This is all the JavaScript we need. Now, we can jump ahead to AssemblyScript!
Export functions
The main entry source code file is assembly/index.ts. At the beginning, we will write code directly into this file. Later, we will structure the code base in multiple files based on objects we will model our game with.
The contract between the Wasm module and JS glue code defines two functions: start and update. To make those visible from outside the Wasm module we use the export keyword:
export function start(): void {
  // start game
}

export function update(control: i32): void {
  // update game
}
Input controls
With AssemblyScript we can use high-level programming at the boundaries. We will model the controls as an enumeration rather than just an integer. This makes our code more maintainable:
export enum Controls {
  None,
  Right,
  Left
}

export function update(control: Controls): void {
  // update game
}
By exporting the Controls enumeration, the items will be visible by the full name in the module exports as global variables:
wasm['Controls.Right'] // WebAssembly.Global
We can use this in our JS glue code to fix our previous attempt:
const Controls = {
  None: 'Controls.None',
  Right: 'Controls.Right',
  Left: 'Controls.Left'
}

// ...

wasm.update(wasm[control]);
Furthermore, we don’t need to work with ugly and error-prone integers anymore.
Output data
With every game update we generate a new screen image based on the current game state. We save the image data in the Wasm linear memory as quadruples of RGBA bytes.
To avoid conflicts with AssemblyScript internal structures that are also stored in the memory (so far WebAssembly supports only a single memory) we need to reserve a piece of memory only for our output.
We can achieve this by giving the compiler a hint via the --memoryBase flag. As our game screen has size 100x100 pixels and each pixel has four bytes (RGBA) we need to reserve 100x100x4 = 40.000 bytes of memory:
$ npm run asbuild:optimized -- --memoryBase 40000
We will use the store<u8> built-in instruction to store a byte into a particular memory cell. For one pixel we call the instruction four times (RGBA):
store<u8>(ci,     data[di]);
store<u8>(ci + 1, data[di + 1]);
store<u8>(ci + 2, data[di + 2]);
store<u8>(ci + 3, 255);  // always visible
Image assets
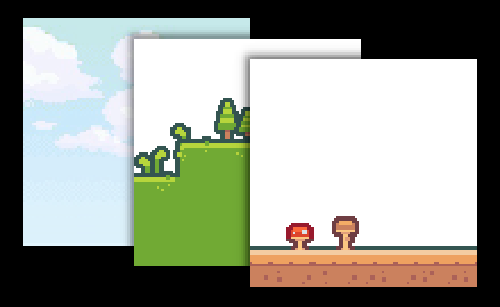
We want to use image assets for our game. For our demo, we will use the Pixel Platformer, a free image collection of building blocks and characters.
For the sake of clarity, the next section shows the mechanical processing of assets into AssemblyScript. In real-world scenarios, some kind of ASC transform would be handy.
Check out the alternative branch to see it in action.
Assets must be prepared in a form AssemblyScript can work with. We will align the image data with the memory structure. For this, we can use a simple script that generates an AssemblyScript u8[] array from an image with a little help from pngjs:
// image2array.js
const fs = require('fs');
const PNG = require('pngjs').PNG;

const filename = process.argv[2];

const file = fs.readFileSync(filename);
const png = PNG.sync.read(file);
const data = png.data;

const out = process.stdout;

out.write('const image: u8[] = [');

for (let i = 0; i < data.length; i += 4) {
  const r = data[i];
  const g = data[i + 1];
  const b = data[i + 2];
  const a = data[i + 3];

  out.write(`${r},${g},${b},${a},`);
}

out.write('];\n');
out.write('export default image;\n');
Executing this script with an image file as an argument will print the output to stdout:
$ node image2array.js assets/sky.png > assembly/sky.ts
$ less assembly/sky.ts
const image: u8[] = [198, 233, 234, 255, ... ];
export default image;
Although this looks quite ugly and tedious, the array will be at the end of the day compactly stored in the linear memory by the AssemblyScript compiler:
(data (i32.const 43468) "@\9c\00\00\c6\e9\ea\ff...
Now, we can work with the image data from AssemblyScript code:
import sky from './sky';

// ...

image: u8[] = sky;

store<u8>(ci,     image[di]);
store<u8>(ci + 1, image[di + 1]);
store<u8>(ci + 2, image[di + 2]);
store<u8>(ci + 3, 255);
Parallax scrolling
Parallax scrolling is a technique in computer graphics where background images move past the camera more slowly than foreground images, creating an illusion of depth in a 2D scene of distance. ~ Wikipedia
We will use three background images: sky, forest, and ground. The sky is static while the forest and the ground move at different speeds.
Background layers
In the update function, we draw layers with a different numeric speed constant:
drawLayer(sky);
drawLayer(forest, position, 5);
drawLayer(ground, position, 1);
The position variable holds respectively, the position of the camera and of the player.
Based on this constant a relative x-axis offset is calculated for the particular layer. This difference results in different movements in the layers:
function drawLayer(
    image: u8[], offset: i32 = 0, speed: i32 = 0): void {
  const imageOffsetX = speed > 0
      ? offset / speed
      : offset;

  for (let y = 0; y < HEIGHT; y++) {
    for (let x = 0; x < WIDTH; x++) {

      // image data index
      const di = arrayIndex(
         (x + imageOffsetX) % WIDTH, y, WIDTH, HEIGHT
      );

      if (image[di + 3] < 100) continue;  // not visible

      // canvas index
      const ci = arrayIndex(x, y, WIDTH, HEIGHT);

      store<u8>(ci,     image[di]);
      store<u8>(ci + 1, image[di + 1]);
      store<u8>(ci + 2, image[di + 2]);
      store<u8>(ci + 3, 255);
    }
  }
}
The result looks like follows:
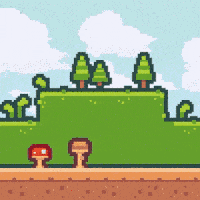
Parallax scrolling
You can find the source code for this parallax scrolling demo on my GitHub.
Local hero
The player is the entity that impacts the whole game. The player position is the position of the camera.
Our hero is a little breadcrumb that got lost in the forest and we shall help it find its way home.
We can move the breadcrumb to the right or to the left. Later, when we add obstacles and enemies, we will give the breadcrumb the ability to jump.
At this point, we should switch to object-oriented programming so we can separate the responsibilities of the game elements and make the code more maintainable.
Let’s start with the three main objects: Game, Player, and Scene.
We will also move all logic for data rendering to a separate object Canvas. In our case, rendering is implemented by storing bytes to the memory.
The responsibility of the Game is to update the Player based on the requested action (move, jump), calculate interactions with the environment and render the updated status:
export class Game {

  private scene: Scene;
  private player: Player;

  constructor(canvas: Canvas) {
    this.scene = new Scene(canvas);
    this.player = new Player(canvas);
  }

  update(control: Controls): void {
    this.updatePlayer(control);
    this.drawGame();
  }

  private updatePlayer(control: Controls): void {
    // ...
  }

  private drawGame(): void {
    // ...
  }
}
We will update the Player according to the requested action:
private updatePlayer(control: Controls): void {
  switch (control) {
    case Controls.Right:
      this.player.moveRight();
      break;
    case Controls.Left:
      this.player.moveLeft();
      break;
    case Controls.Up:
      this.player.jump();
      break;
    default:
      this.player.idle();
      break;
  }
  this.player.update();
}
Rendering the Game means drawing all the game elements in a particular order:
private drawGame(): void {
  this.scene.draw(this.player.position());
  this.player.draw();
}
We are using the Painter's algorithm so that we draw each element starting with the farthest and finishing with the closest.
The rendering is performed by each particular object. The idea behind this is that the object alone should know best how to draw itself. For instance, parallax scrolling is the full responsibility of the Scene:
export class Scene {

  private canvas: Canvas;

  constructor(canvas: Canvas) {
    this.canvas = canvas;
  }

  draw(position: i32): void {
    this.drawLayer(sky, 0, 0);
    this.drawLayer(forest, position, 3);
    this.drawLayer(soil, position, 1);
  }

  private drawLayer(
      image: u8[], offset: i32, speed: i32): void {
    const imageOffsetX = speed > 0
      ? offset / speed
      : offset;
    this.canvas.drawBackground(image, imageOffsetX);
  }
}
It is basically the same code we have already seen just encapsulated in an object class.
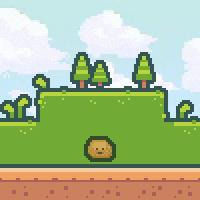
Lost breadcrumb
Take your chance
When placing obstacles and monster enemies we want to make the game a bit more dynamic. A generator of random numbers would be really useful here.
As WebAssembly has no access to system resources per se, we have to pass a seed to the random generator that is provided by the AssemblyScript language. The seed must be imported from the host; in our case, the web browser:
const wasm = await WebAssembly
  .instantiateStreaming(fetch('../build/optimized.wasm'), {
    env: {
      abort: (_msg, _file, line, column) =>
          console.error(`Abort at ${line}:${column}`),
      seed: Date.now  // random seed
    }});
Now, we can use randomness in AssemblyScript:
private releaseMonsters(): Monster[] {
  const monsters: Monster[] = [];
  const count = i32(
      Math.random() * (MAX - MIN) + MIN);

  for (let i = 0; i < count; i++) {
    monsters.push(new Monster(this.canvas));
  }
  return monsters;
}
With changes (and monsters) the game becomes way more exciting:
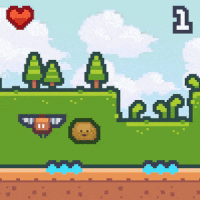
Let's play!
And that’s all you need to create your own 2D video game from scratch!
You can find the source code for this demo on my GitHub or you can play it online at https://ttulka.github.io/breadcrumblost/.
Happy gaming!