


Building Container Images without a Dockerfile
Container images are just tarballs with a bit of configuration. Dockerfiles are just one option to create them.
When I added the creation of container images for our services into the build process, my colleagues asked me in the review: "Where are all Dockerfiles?" There were none. I didn't really need them.
In this post, we will see (and demystify) what an image is, how it is created, and which alternatives to Dockerfiles we have.
Let’s start with some definitions.
Container Image
An image is a way of packaging an application in order to run as a container.
There are several image formats for different container runtimes. In this text, we will talk exclusively about the OCI Image Format which is standardized and supported by Docker.
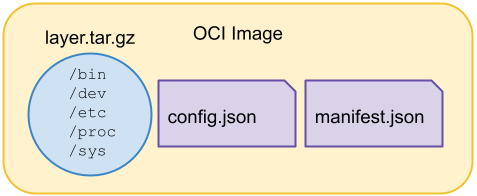
An image consists of layers (tarballs that contain a filesystem bundle), manifest, and configuration. Optionally, an image index can be included for one or more platforms.
Container Runtime
A container is a way of executing processes with isolation provided by three Linux technologies: chroot, namespaces, and control groups (cgroups).
Note, that there are Windows containers, too. However, this text focuses exclusively on Linux containers.
Chroot can change the root directory / for the process, namespaces group resources together so the processes in a namespace can see only resources in that namespace, and finally cgroups can set CPU and memory limits for processes.
OCI provides a runtime specification that is supported by Docker. However, there are different container runtimes such as LXC or Kata Containers.
OCI reference implementation is runc. It is a low-level runtime that actually creates and executes containers. Runc is a component of containerd which is a daemon that manages the lifecycle of containers. Containerd saves and downloads images, manages memory and networking. It is used by Docker and Kubernetes (via the Container Runtime Interface).
An Image from Scratch
To demonstrate how containers work under the hood, we will create a super simple “distroless” image from scratch and run it by hand.
Distroless means no operating system specific binaries like package managers or shells are included. Instead, we will create our own simple shell in Go.
Penguin Shell
To make the container a bit useful and easy to recognize we will include a small shell written in Go with commands ls, cd, and echo.
The program is a simple loop that reads the user input, parses commands and executes:
func main() {
  reader := bufio.NewReader(os.Stdin)
  for {
     fmt.Print("🐧 ")

     // read the keyboard input
     input, err := reader.ReadString('\n')
     if err != nil {
        fmt.Fprintln(os.Stderr, err)
     }
     // handle the execution of the cmd
     if err = execCmd(input); err != nil {
        fmt.Fprintln(os.Stderr, err)
     }
  }
}
The whole implementation can be found on my GitHub.
It is important that all dependencies are statically linked because the program is supposed to run inside the minimalist container with no libraries installed:
$ go build penguinshell.go
$ ldd penguinshell
        not a dynamic executable
Filesystem Bundle
As our shell program has no dependencies we need only the bare minimum on the root: bin (where the shell binary will be placed into), dev (devices), etc (settings), proc (processes), and sys (cgroups, besides others):
$ mkdir -p image/layer && cd image/layer
$ mkdir bin dev etc proc sys
$ cd ../..
$ cp penguinshell image/layer/bin
Now, we can run our shell in the filesystem bundle with chroot:
$ sudo chroot image/layer /bin/penguinshell
🐧 ls /
bin dev etc proc sys
🐧 exit
$
Namespaces and cgroups are out of the score of this text, you can read more details in this excellent article by Eric Chiang.
Image Tarball
In order to create an image from our filesystem bundle we pack the bundle into a tarball:
$ cd image/layer
$ tar -cvf ../layer.tar *
Now, we can simply import the tarball to our local Docker instance to create a new filesystem image:
$ cat layer.tar | docker import - penguinshell
sha256:cada8d0aacf0...
$ docker image ls | grep penguinshell
penguinshell  latest  cada8d0aacf0  ...
We can run the image right away:
$ docker run --rm -it penguinshell -- /bin/penguinshell
🐧 ls /
bin dev etc proc sys
🐧 exit
$
This is great, we have just created a local container running only our application with no other dependencies!
OCI Image
In the previous section, Docker created an image from a tarball for us. We can do the same without Docker. First, we gzip the filesystem layer:
$ cd image/layer
$ tar -czvf ../layer.tar.gz *
Then, we obtain the SHA256 digest for it, its diff ID, and size in bytes:
$ sha256sum < layer.tar.gz
<layer-digest>
$ gunzip < layer.tar.gz | sha256sum
<diff-id-digest>
$ stat -c%s layer.tar.gz
1303821
Next, we create a config.json:
{
 "architecture": "amd64",
 "os": "linux",
 "config": {
   "Env": ["PATH=/bin"],
   "Entrypoint": ["penguinshell"]
 },
 "rootfs": {
   "type": "layers",
   "diff_ids": ["sha256:<diff-id-digest>"]
 }
}
And obtain its digest and size in bytes:
$ sha256sum < config.json
<config-digest>
$ stat -c%s config.json
261
The last puzzle piece is the manifest.json file:
{
  "schemaVersion": 2,
  "mediaType": "application/vnd.docker.distribution.manifest.v2+json",
  "config": {
    "mediaType": "application/vnd.docker.container.image.v1+json",
    "size": 261,
    "digest": "sha256:<config-digest>"
  },
  "layers": [
    {
      "mediaType": "application/vnd.docker.image.rootfs.diff.tar.gzip",
      "size": 1303821,
      "digest": "sha256:<layer-digest>"
    }
  ]
}
Pushing the Image
When we have our image in the OCI format, nothing prevents us from pushing it into a Docker registry, Docker Hub in our case.
The process has three phases:
- Get the access token
- Push the image layer
- Push the config
- Push the manifest
Phases 2. and 3. each consists of three steps:
- Initialize a new upload and get an upload location
- Send binary data to the location
- Commit the upload with the digest
For the sake of brevity, we will show only the pushing of the image layer.
First, we need to get an access token for the rest operations:
$ USERNAME=ttulka
$ curl -v -u "$USERNAME" \
  "https://auth.docker.io/token?service=registry.docker.io&scope=repository:$USERNAME/penguinshell:pull,push"
After typing a correct password for the USERNAME, we got an access token as part of the response:
$ TOKEN=<token-from-respose>
With a valid token, we initialize the upload and get the upload location in the response:
$ curl -v -d '' -H "Authorization: Bearer $TOKEN" \
"https://registry.hub.docker.com/v2/$USERNAME/penguinshell/blobs/uploads/"
Next, we send the content to the location:
$ LOCATION=<location-from-response>
$ curl -v -H "Authorization: Bearer $TOKEN" \
  -X PATCH $LOCATION \
  -H "Content-Type: application/octet-stream" \
  --data-binary @layer.tar.gz
At last, we have to commit the upload with the digest:
$ LOCATION=<location-from-response>
$ curl -v -H "Authorization: Bearer $TOKEN" \
  -X PUT "$LOCATION&digest=sha256:<layer-digest>"
Repeat steps for config.json. After that, we push our image manifest:
$ curl https://registry.hub.docker.com/v2/$USERNAME/penguinshell/manifests/latest \
  -v -X PUT \
  -H "Authorization: Bearer $TOKEN" \
  -H "Content-Type: application/vnd.docker.distribution.manifest.v2+json" \
  --data-binary @manifest.json
After pushing the manifest successfully, we can pull and run our image from everywhere:
$ docker run --rm -it ttulka/penguinshell
Unable to find image 'ttulka/penguinshell:latest' locally
latest: Pulling from ttulka/penguinshell
<layer-digest>: Pull complete
Digest: sha256:<manifest-digest>
Status: Downloaded newer image for ttulka/penguinshell:latest
🐧 ls /
bin dev etc proc sys
🐧 exit
$
Congratulations, we have just created a new Docker image from scratch without using Docker whatsoever!

Penguin shell on Docker Hub
For more details, you can read how to build containers the hard way.
Building Tools
We have seen that an image is just a bundle of files. In extreme cases, it could be even crafted by hand. However, there are more convenient ways to create an image.
Dockerfile, albeit quite low-level, is one of them. We can create the same image from above with the following Dockerfile:
FROM scratch
COPY penguinshell /bin/
ENTRYPOINT ["/bin/penguinshell"]
A Dockerfile is a bunch of instructions for Docker to build an image:
$ docker build -t penguinshell:dockerfile .
Sending build context to Docker daemon  8.141MB
Step 1/3 : FROM scratch
--->
Step 2/3 : COPY penguinshell /bin/
---> e1528c3ae6d7
Step 3/3 : ENTRYPOINT ["/bin/penguinshell"]
---> Running in 80669d36fef0
Removing intermediate container 80669d36fef0
---> 359870e7b0a8
Successfully built 359870e7b0a8
Successfully tagged penguinshell:dockerfile

$ docker run --rm -it penguinshell:dockerfile
🐧 ls /
bin dev etc proc sys
🐧 exit
$
This works fine for simple images like this one. For more complex images we would like to free ourselves from this low-level code.
Let us explore a popular tool for creating images without Dockerfiles: Cloud Native Buildpacks (Buildpacks for short) from the CNCF ecosystem.
Buildpacks
Buildpack’s job is to create an image from the application source code with a minimal setup and all necessary dependencies without any user interaction.
Buildpacks use two different images: a builder image and a base image. The former is used to build the application from source code and the latter is used to run it.
There are a lot of pre-configured buildpack builders to choose from. They are easy to integrate into the build process. Buildpack detects automatically which builder to use for a particular application being built.
For our sample application from above, we can simply run this Buildpack CLI command:
$ pack build penguinshell:buildpack \
  --builder gcr.io/buildpacks/builder:v1
v1: Pulling from buildpacks/builder
...
===> DETECTING
4 of 6 buildpacks participating
google.go.runtime  0.9.1
google.go.gopath   0.9.0
google.go.build    0.9.0
google.utils.label 0.0.1
===> ANALYZING
Previous image with name "penguinshell:buildpack" not found
===> RESTORING
===> BUILDING
=== Go - Runtime (google.go.runtime@0.9.1) ===
...
===> EXPORTING
...
Saving penguinshell:buildpack...
*** Images (e868002da2ce):
     penguinshell:buildpack
...
Successfully built image
As you can see from the log, Buildpack recognized our Go source code, built it, and pushed a new image:
$ docker run --rm -it penguinshell:buildpack
🐧 ls /
bin boot cnb dev etc home layers lib lib64 media mnt opt proc root run sbin srv sys tmp usr var workspace
🐧 exit
$
The base image is obviously different. It contains multiple layers and more files than the image we created from scratch.
In general, unnecessary functionality is a potential risk. In most cases, we can live with this risk as Buildpack base images are quite minimal. In the rest cases, we can build our own buildpack specific to our needs.
Note that for some kinds of applications we don’t even need the Buildpack CLI to be installed. For example, Spring Boot integrates Buildpack in its Gradle and Maven plugins.
Buildpacks are not the only tool for building images without Dockerfiles. Some of them, like Jib, do not even need a Docker engine to work.
You may also take a look at Jib, buildah, PouchContainer, and kaniko.
Conclusion
In this post, we have demystified container images by creating one from scratch by hand.
Also, we have shown other convenient ways to build images without a Dockerfile.
Now, you have a good starting point to build perfect images for your applications. The world of containers is extensive and possibilities are almost unlimited.
Happy containerizing!