


Containers under the Hood
Let’s talk about the underlying technology that enables containers under Linux, and build a container from scratch!
Containers are literally everywhere. If you are a developer, you probably deploy your applications as containers on the server and use their disposability to test and experiment locally on your laptop.
In the preceding years, containers became not only ubiquitous but, sadly, kind of magical. They are everywhere, everyone uses them, but how many people actually know how containers work?
In this text, we will delve deeper into the technology that makes containers possible. We will demystify containers by creating one from scratch and running it by hand with no convenient tools like Docker.
That will help us to understand what containers really are and that there is no actual magic involved.
What the heck are containers?
You probably work with containers every day but do you actually know what they are? Think about it for a second or two. Take your time. No cheating! Now, compare your definition with this one:
Containers are a way of executing processes with isolation.
With containers, we can run a process and its subprocesses in isolation from the underlying system and all other containers. Each container has its own view on the operating system, its own filesystem, and access to an individual subset of resources (such as memory and CPU).
Although sufficient for most applications, container isolation is not perfect. Containers are therefore recommended to run only trusted code. If you need to run potentially unsafe and malicious code, virtual machines should be used instead.
Docker equals containers, not
Allow me to make an observation about Docker as it became practically a synonym for containers, and with some justification.
Docker is the first tool that introduced the idea of containers to a broad audience. It is still very popular nowadays (although alternatives exist) as it provides a convenient and abstract way how to deal with the whole container lifecycle and solves hard problems such as communication between containers and networking.
So, what the heck is Docker?
The term Docker has several meanings. The most practical of these states that Docker is a set of tools for containerization counting Docker Desktop, Docker Compose, Docker Swarm, etc. Furthermore, Docker is the company (Docker, Inc.) behind these tools.
Docker is also one of the founders of the Open Container Initiative (OCI), an open governance structure for creating open industry standards around container formats and runtimes. OCI standards are mostly based on the former Docker specifications.
Today, Docker supports the OCI specifications and uses OCI components such as containerd and runc under the hood:
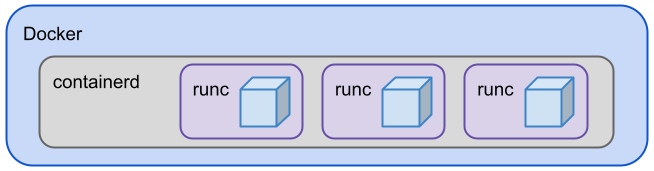
Runc is a production-ready OCI reference implementation. It is a low-level runtime that actually creates and executes containers. Runc is a component of containerd which is a daemon that manages the lifecycle of containers. Containerd saves and downloads images, manages memory and networking. Besides Docker, it is used by Kubernetes (via the Container Runtime Interface) and others. Runc and containerd can be used as separate tools as well.
OCI is not the only standard around. There are, for example, LXC (originally used by Docker), Kata containers, and others.
In this text, we talk about Linux-based containers exclusively. Windows containers are definitely a thing, however, far not as popular as their Linux relatives.
How to run processes in isolation
Running processes in isolation is possible via three Linux technologies: changing the root filesystem (chroot), namespaces (unshare), and finally control groups (cgroups).
By changing the root we can isolate the process filesystem and protect the system filesystem from unwanted changes.
Namespaces create a sliced view on the system resources such as process IDs, mount points, networks, users, etc.
Control groups can restrict various computer resources such as memory, CPU, or network traffic.
These three technologies are all we need to run containers under Linux. Let’s take a closer look at all of them one by one.
Change root
It is easy to change the apparent root directory for a process (and its children). We can achieve that with just one call of the chroot operation:
$ chroot rootfs /bin/sh
The first argument is a path to the new root, the second one is a command to be executed.
Let’s see chroot in action:
1. Download BusyBox
BusyBox is a utility suite providing all basic Linux command-line tools in a single executable file. We will use BusyBox as a basis for our hand-made containers.
Download a BusyBox binary and make it executable:
$ cd ~/Downloads	 # location of binary
$ mv busybox-x86_64 busybox
$ chmod +x busybox
$ ./busybox echo Hello from BusyBox!
Hello from BusyBox!
$
2. Prepare a new container filesystem
Create a simple Linux-like directory structure and copy the BusyBox executable to the bin directory:
$ mkdir ~/container ; cd !$
$ mkdir -p bin dev etc proc sys
$ cp ~/Downloads/busybox bin
3. Change the root directory
Change the root to the actual directory and execute the BusyBox’s shell:
$ sudo chroot . /bin/busybox sh
/ #
Very cool, we can now execute some commands under the new containerized filesystem:
/ # busybox ls /
bin   dev   etc   proc  sys
/ # busybox ls /bin
busybox
/ # busybox ls /proc
/ #
/ # busybox ps -A
PID   USER     TIME   COMMAND
/ #
Well, there is not much here. To do something useful, we shall mount some system resources first.
4. Mount system processes and devices
Exit the container and mount the system /proc directory to our container filesystem:
/ # exit
$ sudo mount -t proc /proc ./proc
Now, the ps command can see all processes:
$ sudo chroot . /bin/busybox sh
/ # busybox ps -A
PID  USER  TIME  COMMAND
  1 0       0:01 {systemd} /sbin/init splash
  2 0       0:00 [kthreadd]
  3 0       0:00 [rcu_gp]
... a lot of processes here
/ #
/ # busybox ls /proc
1    1223    17    34    6
... a lot of processes here
The obvious problem is that we can actually see all the host processes, not only the processes which run within the container. Chroot alone is not enough to run processes in isolation. We have to reach for another tool: namespaces.
Read more about chroot on the manual page.
Chroot is not a Linux-exclusive tool. Most UNIX operating systems (even MacOS) include the chroot operation in their basic equipment.
Namespaces
Namespaces are an isolation mechanism. Their main purpose is to isolate containers running on the same host so that these containers cannot access each other’s resources.
Namespaces can be composed and nested — a process IDs namespace on the host machine is the parent namespace of other namespaces.
Let’s fix our previous attempt by running the container in a PID namespace:
$ sudo unshare -f -p --mount-proc=$PWD/proc \
  chroot . /bin/busybox sh
/ # busybox ps -A
PID  USER  TIME  COMMAND
  1 0       0:01 /bin/busybox sh
Much better! We have isolated the container’s process into a separate namespace and other processes of the host became invisible inside the container.
However, the process is still visible from the parent namespace (in a second terminal):
$ ps aux | grep /bin/busybox
root    24163    ...    /bin/busybox
More details about namespaces can be found on the manual page.
Namespaces in Docker
You can simply check that processes running in a Docker container are indeed child processes of the PID namespace on the host machine:
$ docker run --rm -d busybox sleep 1234
<container-id>
$ ps aux | grep "sleep 1234"
root    29046    ...    sleep 1234
</container-id>
Control groups
Control groups (cgroups) can restrict various computer resources for processes.
Cgroups are organized into subsystems per resource type (CPU, memory, etc.). A collection of processes can be bound to a cgroup.
Let’s use cgroups to restrict memory usage for our process:
1. Create a new cgroup
Cgroups are located in /sys/fs/cgroup/<subsystem>, in our case /sys/fs/cgroup/memory.
We can create a new cgroup simply by making a new directory in the subsystem directory. The Linux system will take care of the initialization:
$ sudo su   # superusers only
# mkdir /sys/fs/cgroup/memory/busybox
# ls -1 /sys/fs/cgroup/memory/busybox
...
memory.limit_in_bytes
...
tasks
#
As you can see, control files were created automatically for you. For our experiment, we will consider the above-listed two.
2. Setup the cgroup
To limit memory usage in the cgroup we can simply put the maximal memory size in bytes into memory.limit_in_bytes inside the cgroup directory (continue as a superuser):
# cd /sys/fs/cgroup/memory/busybox
# echo 7340032 > memory.limit_in_bytes
# exit
$
3. Add a process into the cgroup
To add a process into a cgroup we must append the process ID into the tasks file:
$ sudo /bin/sh	# start a new shell
# cd /sys/fs/cgroup/memory/busybox
# echo $$ >> tasks
4. Test it
Now, an attempt to load more than 7 MB of data into memory will fail:
# toomuch=$(head -c 7500000 /dev/urandom)
Killed
$
Our process was killed by the kernel as it ran out of memory limits defined in the cgroup.
The process ID was removed from the cgroup automatically:
$ cat /sys/fs/cgroup/memory/busybox/tasks
$
5. Clean up
Afterwards, don’t forget to remove the cgroup we created:
$ sudo rmdir /sys/fs/cgroup/memory/busybox
For more information about cgroups see the manual page.
Cgroups in Docker
To see cgroups in action simply start a Docker container with limited memory of 7 MB:
$ docker run --memory=7m --rm -d busybox
<container-id>
Now, the memory control group is limited to 7 MB (7340032 bytes) for the container:
$ cd /sys/fs/cgroup/memory/docker/
$ cat <container-id>/memory.limit_in_bytes
7340032
Control groups are the final piece of the puzzle. Having seen it, we can put it all together to run full-featured containers on our own.
Putting it all together
Technically seen, containers are baked by chroot, namespaces, and control groups.
Containers = chroot + namespaces + cgroups.
Let’s put them together to run a BusyBox container via a simple shell script.
First comes a hashbang and constant definition:
#!/bin/sh
memoryLimit=7340032	# 7 MB
The ID of the wrapping process will be used to identify the container runtime:
pid=$$
The container will live in the /tmp directory:
mkdir -p /tmp/container/$pid
cd /tmp/container/$pid
The container filesystem is of the simplest kind:
mkdir -p bin dev etc proc sys
BusyBox will provide all tools:
cp ~/Downloads/busybox bin
chmod +x bin/busybox
Processes are mounted:
sudo mount -t proc /proc proc
Memory limits are set via control groups:
cgDir=/sys/fs/cgroup/memory/container$pid
sudo mkdir $cgDir
sudo su -c "echo $pid > $cgDir/tasks"
sudo su -c "echo $memoryLimit > $cgDir/memory.limit_in_bytes"
To test the memory limit we can also mount /dev/urandom to read random data inside the container:
touch dev/urandom
sudo mount --bind /dev/urandom dev/urandom
Let’s start the container with help from chroot and namespaces:
sudo unshare -f -p --mount-proc=$PWD/proc \
    chroot . /bin/busybox sh
After this command is executed, the newly created process overtakes the control flow. The following lines are executed first when the container process finishes.
To clean up control groups, we must add the process into the parent group first, and then we can remove the whole group directory:
sudo su -c "echo $pid > $cgDir/../tasks"
sudo rmdir $cgDir
Finally, we can unmount devices and delete the container for good:
sudo umount dev/urandom
sudo umount proc
rm -rf /tmp/container/$pid
You can find the whole source code for the shell script above on my GitHub.
By executing the script you can do something useful inside the container:
$ sudo ./container.sh
/ #
/ # busybox echo Hello from a container!
Hello from a container!
/ # busybox ls /
bin   dev   etc   proc  sys
/ # data=$(busybox head -c 7500000 /dev/urandom)
Killed
$
Congratulations, you have just killed your own full-featured container!
Now, you can uninstall Docker from your laptop and start writing your own “Docker” in whatever language you like.
Container images
Creating containers manually is a simple yet exhausting process. That’s why we have container runtimes to do the heavy lifting for you. There are a few specifications of container runtimes out there; we have already talked about containerd that implements the popular OCI specification.
One great benefit of containers for application deployment is reproducibility. This means a container is always the same when created and destroyed again and again. We need some kind of description of the container to achieve reproducibility. We call these descriptions container images or just images for short.
Images are blueprints for creating containers. Image format must be understood by the runtime so it can create reproducible containers by following instructions described in the image.
An image is a way of packaging an application in order to run as a container.
For example, OCI images are just tarballs with a bit of configuration. Simple as that. Pack a root filesystem directory structure into a TAR package and configure it with parameters such as entry point command in a short JSON file. Easy as that.
We won’t delve deeper into images in this place as they exist on the higher level of abstraction behind the world of container primitives we focus on in this text.
For more information about images, you can read my article on building container images from scratch.
Conclusion
Containers are an amazing and surprisingly simple piece of technology.
Under the hood, they are made of three Linux primitives: chroot, namespaces, and cgroups. We have seen all of them in action in this text.
Images are application packages that a container runtime understands. We have just talked about the OCI image format specification.
Key takeaways are:
- Containers are a way of executing processes in isolation.
- Images are a way of packaging an application in order to run as a container.
Thank you for joining me on the exciting journey into the heart of containers. I hope you have gained a deeper overview of what containers are and how they work.
Happy containerizing!